

Start a new workflow
Select New workflow to open a dialog with these ways to start. When you don’t have any workflows yet, the workflow list offers the same starts right there: Describe what it should do, Blank workflow, and the templates.- Describe it. Write what the workflow should do, for example “Translate a text into Japanese and Spanish at the same time”, and select Build it (or press ⌘Return). The workflow opens with the assistant already building it; review its steps and select Save when they look right.
- Start from a template. Pick Blank, Research a topic, Summarize a web page, Notes from a YouTube video, Write and read aloud, or Tour of step kinds (a shell command, a tool, a prompt, and an agent, with two jobs running side by side). Every template is a complete workflow you can run right away.
- Import a file. Select Choose file…, or drop a
.yaml,.yml, or.jsonworkflow file anywhere on the dialog, for example one a teammate shared. The workflow is saved as a new workflow, so it never replaces one you already have. If its title matches one in your list, it’s named like a copy, such as “News copy”. If the file isn’t a valid workflow, the dialog stays open and tells you why. - Paste it. Paste a workflow’s YAML or JSON, such as one shared in a chat, into the description box. Build it becomes Import it, and the workflow is created exactly as pasted.
- Export as a YAML file… saves a
.yamlfile where you choose. Import it with New workflow > Choose file… on any Mac. - Copy YAML copies the workflow, ready to paste into a chat or into the New workflow description box, which imports it.
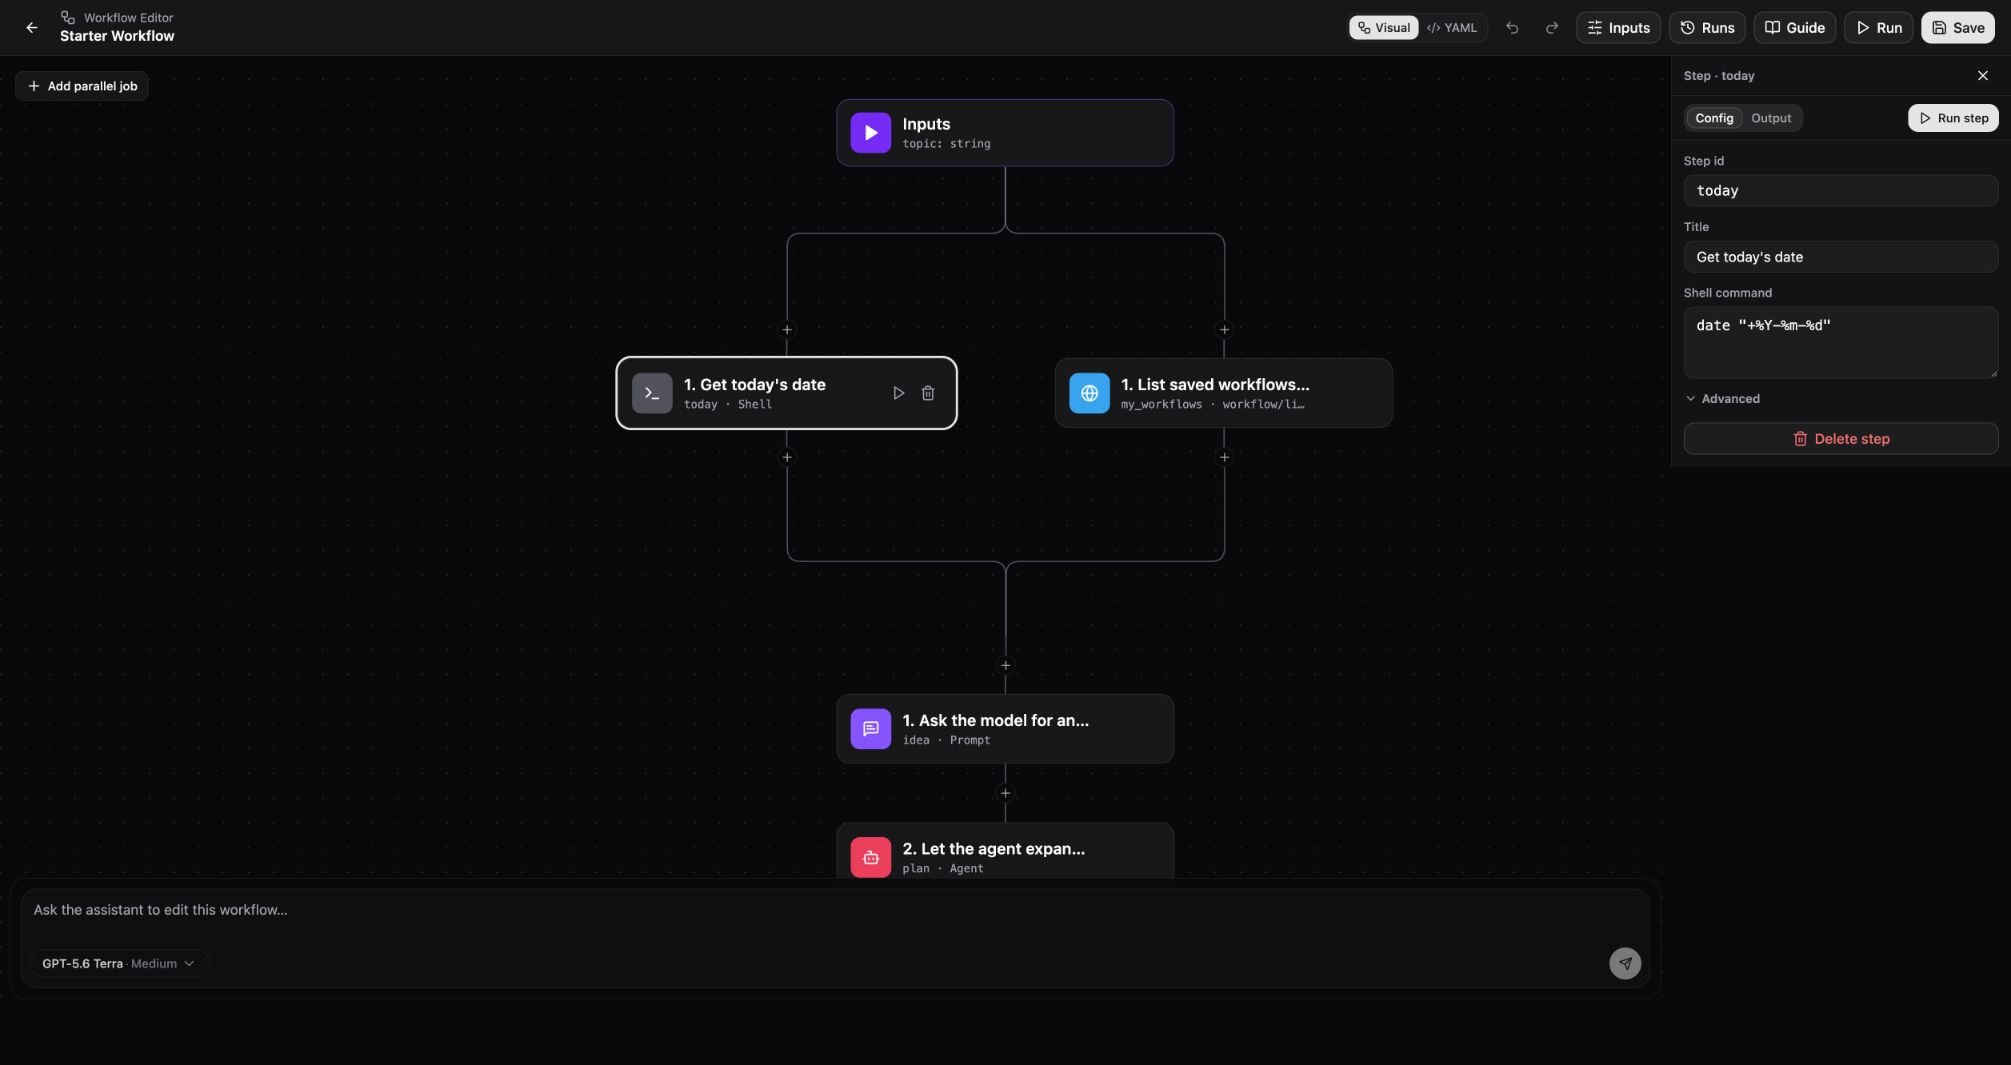
The Visual editor shows parallel jobs, sequential steps, and the selected step's configuration.
Build with the Visual editor
- Select Visual in the editor toolbar.
- Use Add step here between nodes to insert a step, or Add parallel job for a separate branch. The step list opens with Recently used, the last few steps and tools you picked, so the ones you add often are one click away. A plugin with many tools lists its first eight; select Show N more to see the rest, or type to search.
- Select a step to open its inspector. Edit its ID, title, and executor settings, and open Behavior to change how it runs.
- Select the Inputs node to configure the workflow’s declared inputs: a name, a type (text, number, true/false, list, or object), a description, a default, and whether a run needs a value. Under each name, the panel shows how steps read the input, such as
{{ inputs.topic }}, and how many steps do. Renaming an input updates those steps to the new name. A name can use letters, digits, and underscores, can’t start with a digit, and must not match another input. - Review the graph and use Undo or Redo while editing.
- Select Save after reviewing your changes.
fetch_2.
Steps in a job run from top to bottom. To change the order, drag a step’s card up or down within its job; the other cards move aside to show where it will land. You can also select a step and choose Move up or Move down in the inspector, or press ⌥↑ or ⌥↓. Press ⌘Z to undo a move. If a step ends up above a step whose result it reads, its card shows a warning until you move it back below.
To leave a step out for now without deleting it, select it and choose Turn off step. Its card fades and shows Off, runs skip it, and the steps after it still run. Choose Turn on step to bring it back.
To change several steps at once, hold ⌘ or Shift and click their cards. A bar at the top of the canvas shows how many steps are picked, with Turn off (or Turn on) and Delete for all of them. If the delete would break other steps, or empty a job, Enconvo asks first. The confirmation lists each step that depends on the ones you’re deleting and why, such as Uses its output or Waits for it to finish; select one to call off the delete and open that step so you can fix it first. The same happens when you delete a single step. Press Esc or click an empty spot on the canvas to clear the pick, and ⌘Z to undo.
To copy steps, select one (or pick several) and press ⌘C, or select Copy in the bar; ⌘X cuts them. Then select the step they should follow and press ⌘V. The copies land right after it, or at the end of the job when a job is selected, and they keep their settings. A copy whose ID is already taken gets a new one, such as fetch_2, and pasted steps that read from each other follow the new names. Steps paste into another workflow the same way, and ⌘V also accepts a YAML or JSON step list copied from a workflow file. Press ⌘A to pick every step, and ⌫ to delete the selected or picked steps.
To jump to a step in a large workflow, press ⌘F or select the search button on the canvas, type part of the step’s name, ID, tool, or text, and pick it; the step is selected and brought into view. When you delete or paste steps, a notice says what changed; select Undo in it to take that change back. Use the zoom controls in the bottom-right corner of the canvas, or press ⌘= and ⌘- to zoom in and out and ⌘0 to fit the whole workflow in view; select the zoom level to return to 100%. Press ⌘S to save from anywhere in the editor, in Visual or YAML, even while typing in a step’s settings. Press ⌘Return to run the workflow; it is saved first if it has changes. In the YAML editor, the assistant, and other multi-line fields, select Run instead. If the workflow has a problem, such as a step with an empty prompt or a missing description, Save and Run stop and say what to fix; select Show to open the step or the workflow’s title and description. Steps with problems have a red mark on their card; hover over it to read what’s wrong. In YAML, select Validate to check the whole document. While a run is in progress, Run becomes Stop; after you select it, it shows Stopping… until the run has stopped. While a workflow has unsaved changes, the editor header shows Unsaved; select it to see the YAML lines added and removed since the last save, and select Discard changes to go back to the saved version; in the Visual editor, ⌘Z brings your changes back. If you go back to the workflow list with unsaved changes, choose Save and leave, Discard, or Keep editing. Unsaved changes are also kept on this Mac while you edit: if the window closes or reloads before you save, reopening the workflow shows a bar at the top with Restore, which puts your changes back as one step you can undo, or Discard. Changes are offered back only if the saved workflow hasn’t changed since. In the workflow list, such a workflow shows an Unsaved changes tag, and deleting it discards those changes too. To see every canvas shortcut, select the keyboard button next to Add parallel job, or press ?.
Step behavior
The Behavior section of the inspector sets how a step runs without editing YAML. Its header lists what you changed, such as Only if… · Retries 2×, or shows Default.
Output schema takes an optional JSON Schema for a structured result. Choosing a default again removes the setting from the YAML. The Advanced workflows page explains each setting in detail.
Edit YAML
Select YAML to work with the same document as source. The Valid / Invalid badge and Validate action help find malformed definitions. Use letters, digits, and underscores for job and step IDs; start with a letter or underscore. When you switch back to Visual, ⌘Z takes back your YAML edits in one step.Ada in the name field under Inputs. The final step produces Result: Hello, Ada!.
Choose an executor
The following snippets are step entries: place them inside a job’ssteps list.
Shell
steps.today.output.stdout. Optional settings include cwd, shell, timeoutMs, and env. Commands use the permissions of your Mac account; review commands before running them.
Prompt
Agent
Tool
tool is a Local API route in slash form. with supplies parameters (params is an alias). Discover available routes in Settings → Developer → APIs, or ask the editing assistant to inspect installed tools.
Transform and subworkflow
Useuses: transform with a value to combine inputs or previous outputs without calling a model. Use uses: workflow with a saved workflowId, or an inline workflow document, to run a reusable child process. See Advanced Workflows.
Reference earlier results
Add job-level
needs before reading another job’s output. Inspect tool results in Output rather than assuming every tool returns the same fields.
In the Visual editor you don’t need to type these by hand. Select Insert value (the {x} button at the right of a step field, such as the prompt, command, a tool setting, or a condition) to list what that step can read: the workflow’s inputs, the results of earlier steps in its job, the steps of jobs it waits for, and, for a repeated step, the current item or round. Search the list and pick one; it goes where your cursor was, or replaces the text you selected. A shell step offers its printed text as {{ steps.<id>.stdout | trim }}, and a step with an output schema or an earlier run also lists its result fields. Conditions, Stop when, and the list a step repeats over get the right form for that field, such as a bare steps.check.output.ok in a condition.
A field that reads something it can’t reach shows a warning underneath with what to change: an input the workflow doesn’t declare, a step that runs later or is the step itself, a step that belongs to another job, or a job this one doesn’t wait for. On the canvas, a step card with such a value shows a warning icon next to its title; hover it to see what to fix. Warnings don’t stop you from saving.
Use the editing assistant
Select Assistant in the editor toolbar to open the assistant panel beside the canvas, then describe what you want, for example: “Add a prompt step that summarizes the previous result.” For a new, empty workflow you can describe the whole process instead, such as “Every morning, fetch the top Hacker News stories and summarize them.” Press Return to send and Shift-Return for a new line, and choose the model under the composer. While the assistant works, the panel shows what it is doing, such as reading the workflow, checking a tool’s parameters, or editing, and the canvas updates as it goes. The canvas is read-only until the reply finishes; select Stop to end it early. You don’t have to wait for a reply to finish before asking for more. Press Return while the assistant is working and your message waits in a queue above the composer; queued messages are sent one at a time, in order, as each reply finishes. Drag a queued message to reorder it, or use its ⋯ menu to edit it, and select the trash icon to remove it. If you select Stop or a reply fails, the queue is marked Parked and nothing more is sent on its own; select Send on a queued message when you’re ready. When a message can’t wait, such as a correction to what the assistant is doing, press ⌘Return instead of Return, or select Send now on a queued message. The current reply stops, keeps the edits it already made, and is marked Interrupted, and your message is sent right away. The rest of the queue isn’t parked; it’s sent in order after that. Each reply that changes the workflow ends with a card that lists the steps it added, changed, or removed:- Select a step on the card to select it on the canvas and bring it into view. Step IDs the assistant names in its reply, such as
summarize, work the same way. - Select Revert on the latest card to put the workflow back the way it was before that reply. Undo (⌘Z) also takes back a whole reply in one step.
- To ask about one step, select it on the canvas and choose Ask Assistant in its inspector. The step is attached to your next message, so “make this more reliable” means that step.
- When a step fails in a run, choose Fix with Assistant on the run summary or in the step’s Output tab. Your message carries the step and its error, so you don’t have to copy the error in.
- To ask about part of a step’s result, select text in its Output tab and choose Ask Assistant under the selection. The text appears as a quote above the message box and goes with your next message, so you can ask what it means or how to change the step that produced it.
- Select New chat at the top of the panel to start over; the earlier chat stays in the list. Select the chat’s name at the top of the panel to switch back to an earlier chat about the same workflow or to delete one. A saved workflow keeps its last ten chats in this browser.
Run and inspect
- Select Inputs and fill in the values for this run.
- Validate the definition and inspect any commands or tool calls.
- Choose Run and watch step status in the graph.
- Select a step’s Output tab to inspect its result or error. After a run, each step card also shows the first line of what the step returned, or why it failed, in place of its description; select that line to open the step’s Output tab. Select Copy in the Output tab to copy the step’s result, or its error when it returned nothing, for example to paste into a chat or a document.
- Open Runs to inspect previous runs.
- Save the workflow when you are satisfied with its definition.
Run inputs
Inputs in the toolbar opens a form with one field for each input the workflow declares, showing its type, its description, and its default:- Leave a field blank to use its default. Lists and objects take JSON, such as
["a", "b"]. - An input marked Required that has no default needs a value. If it is empty, or a value has the wrong type, Run stops before saving or running anything and points at the field to fix.
- Press ⌘Return in a field to run.
- The form starts from the values the workflow last ran with in Enconvo. Select Clear to empty every field at once, so the next run uses the defaults again. Renaming an input keeps the value you typed for it.
- While a past run from Recent runs is on the canvas, select Use that run’s values to fill the form with the inputs it ran with, then run it again as it was or with a change.
- A blank field shows its default in gray. To change a long default rather than retype it, select Edit default beside the field to put the default in it, then edit.
- In the Visual editor, select Edit inputs to change what the workflow asks for. If steps still read an input you remove, Enconvo names them and asks before removing it. Select Edit as JSON to type the inputs as one JSON object, including keys the workflow doesn’t declare. Use form switches back.
When a run ends
When a run ends, a summary appears at the bottom of the canvas:- If a step failed, the summary names it and shows the line of its error that says what went wrong, such as
command not found: datexrather than only an exit code. Select Show error to open that step’s Output tab and bring the step into view on the canvas. - Select Fix with Assistant to hand the failed step and its error to the assistant. It starts its reply with the cause, then fixes the step. If the cause is outside the workflow, such as a missing API key, a network error, or a missing file, it tells you what to change instead of editing. A failed step’s Output tab has the same Fix with Assistant button.
- Select Resume to continue a failed or stopped run. Steps that already finished keep their results; the failed step and everything after it run again. If you edited a step after the run, that step and the steps after it run again too. If you change the run inputs, the whole workflow runs from the start. Resume also appears next to Run in the toolbar until you start another run.
- After a clean run, select Show output to see the last step’s result. The summary fades after a few seconds unless something needs your attention; select × to close it sooner.
~/.enconvo/workflows/<id>.yaml. Editing a definition and running it are separate actions. A run can consume provider credits or change external data depending on its steps.